Showing posts with label Crafts. Show all posts

Wednesday, November 9, 2011

{ De Colores }


Yes, I know it's over. But, I am still playing catch up on my photos of the Dia de los Muertos masks my daughter and I made. I love all the colors and the flowers involved with this celebration and it makes me think of the song De Colores which my parents often played when I was growing up.


We painted the masks white and then added lots of color, gems, and flowers to make them look very Dia de los Muertos style.


For the month of October, we set up a fun colorful Dia de los Muertos table. 


In addition to the masks, we made Dia de los Muertos coffins which we decorated with flowers and glitter and of course lots of colorful paints. Saylor used her imagination and wrote things like, "Flora Chiquita" and "Beautiful Soul" on the coffins.


Sealed with a Kiss, Kirsten
S.W.A.K.


Wednesday, November 2, 2011

{ Crafting for Dia de Los Muertos }


Got Flowers? Sure do! Used lots of them for our Dia de los Muertos masks which we painted and decorated.


I love these jars of colorful flowers. I found them at 
Michaels craft store. 
Lots of skeleton masks waiting for me and my daughter to paint them and jazz them up into Dia de Los Muertos masks.


Cracking up at a joke I made. Yes, she thinks her Mommy is funny.

We made masks all afternoon and although the sun was out, we were quite chilled and should have worn sweaters. But, despite the aprons, we still had a great deal of paint and glitter all over us and sweaters would have been ruined. I hope a cold and fever do not arrive in a few days. If so, I know she will be happy to stay home and get crafty all over again.

Sealed with a Kiss, Kirsten
S.W.A.K.


Tuesday, November 1, 2011

{ Disco Dancer on the Victrola }


What's playing on my Virtual Victrola today? Death of a Disco Dancer by The Smiths. My daughter and I made coffins for Dia de los Muertos and this is one of the coffins I made. Yes, yes, I know, a bit cheezy. But, oh how I use to LOVE The Smiths and Morrissey during my high school days. Had you opened my locker in high school, you'd have found it covered in Morrissey posters. That was then and I still think Morrissey and the Smiths are awesome, but, no longer in that crazed-loved gladiolas b/c they were Morrissey's favorite flower-obsessed way. haha. If you are or once was a true Smith's fan, then you'd totally get the "Disco Dancer" part of the coffin.
But, if you weren't, then this is my cheezy ode to their song, Death of a Disco Dancer . (be sure to turn off my playlist at bottom of page before listening to my Virtual Victrola)

Sealed with a Kiss, Kirsten
S.W.A.K.

Tuesday, January 18, 2011

Pretty Paper Valentine Flowers


With Valentine's Day approaching, I've been in a flowery making mood lately. So while searching around for inspirational ideas, I came cross THIS by Martha Stewart. It looks easy which, let's face it, is why it appeals to me. I like anything where I get maximum prettiness w/ little effort.

Sealed with a Kiss, Kirsten
S.W.A.K.


Sunday, November 14, 2010


We have a huge collection of sea shells. So many that I don't know what to do with them. I often think of sea shell projects, but end up with a been-there-done-that attitude towards any project ideas I come across. That is until I saw this! I love this idea from Coastal Living Magazine . Plus, it looks easy peezy lemon squeezy! I like the "star" topper on the top of the shell topiary. However, I think I will use starfish.

Sealed with a Kiss, Kirsten
S.W.A.K.

Crazy About This Ornament Idea


I am so gonna stock up on these glass globe ornaments. I am already thinking of all the pretty trinkets and treasures I can place inside each ornament. We live on the northeast coast of Florida, so I am thinking it would be a great idea to fill some of these ornaments with our pretty white powdery sand from the beach and a few shells and send off as gifts to family in Texas.

Sealed with a Kiss, Kirsten
S.W.A.K.

Saturday, November 13, 2010

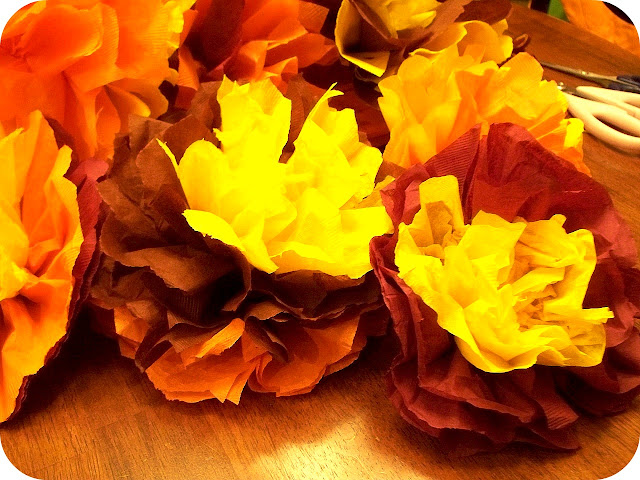
Paper Flowers


Who remembers making paper flowers as a kid and spritzing them with your mom's favorite perfume? On many occasions, I would make paper flowers as a kid in my room and present it to my mom or a teacher as if it was an award winning rose. I used Brawny paper towels at the time. haha. These flowers also make me think of a theme park that once existed in Houston, Texas called Astroworld. There was a kiosk booth which sold these large colorful paper flowers. I use to have one balanced on the top drape in the window of my bedroom.

*Here is a fun quick
easy peezy lemon squeezy
way to make Paper Flowers*

First: Stock up on some party napkins in your colors of choice. I chose Fall colors in shades of burgundy, orange, yellow, and brown. Party supply stores are the best place to find a variety of colors at a low price.

Second: Open one napkin flat on a surface


Third: Choose one or two more colored napkins. Open and layer on top of first napkin. In the photo I off centered the layers to illustrate directions. However, make sure each napkin is even with the one underneath when doing this.

Fourth: Fold the napkins into an accordion/fan style fold


Fifth: Use a sturdy cord to tie the fan in center. I used Bowdabra Bow Wire from Bowdabra .


Sixth: Using scissors, cut a "V" shape or inverted "V" shape at the end of each fan. Use either "V" shape to create a variety in petal styles.

Seventh: Separate each napkin layer on both ends to create the flower.
And then Tada!!!!! There you have it---Paper Flower Palooza
I used these and filled a basket next to my fireplace for Fall and I also used one to decorate the top of a Get Well Package for my daughter's teacher. I think the paper flower possibilities are endless. I plan on making some Poinsettia-style paper flowers in December in reds, whites and pinks! Some will decorate my house and others will be perfect for adding on top of Christmas presents!


Sealed with a Kiss, Kirsten

S.W.A.K.

Thursday, October 28, 2010

Sock Skeleton


Meet Blanch McSkully! I whipped up this cute lanky skeleton in one night using, you guessed it, socks! 1 pair to be exact...except, don't tell Blanch--She would think it quite ghastly if she knew she was made out of socks. I got this idea from none other than the extraordinaire herself, Martha Stewart . This adorable Halloween craft was easy peezy lemon squeezy. Click here for the How-To guide. I am thinking that next year I will make more and embroider pretty art flowers on the face to celebrate Dia de los Muertos aka Day of the Dead . OR, I may just hand over Blanch McSkully to my cat. The entire time I was sewing her arms and legs on, he thought I was creating a wonderful toy just for him. I had to place Blanch on my fireplace mantle to keep her safe from Custard Kitty. His sharp kitty claws and teeth scared her to death, so to speak. Haha!

Sealed with a Kiss, Kirsten
S.W.A.K.

Tuesday, October 12, 2010

Cheezy Kitchen Ghosts


I am starting to think that my kitchen might be haunted. But, luckily, they are the cutest little ghosts to ever haunt a kitchen. Not only are they cute, but, they are also a bit cheezy. THAT'S because they are made out of cheese cloth!
This Halloween craft idea is from Country Living . I have a large beautiful rustic candelabra hanging in my kitchen which I bought 4 years ago at a little shop named Croatia Boutique and Ironworks in Riverside/Avondale area of Jacksonville, Florida. It was the perfect spot to hang my Cheezy Kitchen Ghosts. This Halloween craft project is Easy Peezy Lemon Squeezy. Plus, I like any craft project that can be done while outdoors enjoying the fresh Autumn air. Balloons and fabric stiffener help create the shape of the ghosts. My daughter had a fun time popping the balloons once the cheese cloth had dried. This was a really fun project. Click HERE for instructions to make some cheezy ghosts of your own. Happy Haunting!

P.S. I really like this photo of the ghosts which came out by accident. I was balancing on a step stool so that I could get a photo and slipped off (those who know me best, know that I am clumsy) right when I was taking the picture which created just the right amount of camera shake to create this "ghostly" image of my ghosts. Some of the best things come about by accident.

Sealed with a Kiss, Kirsten
S.W.A.K.

Wednesday, October 6, 2010

Boo-tiful Bunch


I use to think those white tissue paper wedding bells found at party stores were really cheesy.....until now. I love this simple and adorable Halloween idea from Country Living Magazine . Buy a few white paper bells, glue black paper or felt eyes and mouth on them and drape with cheese cloth. Easy Peezy Lemon Squeezy.

Sealed with a Kiss, Kirsten
S.W.A.K.

Saturday, June 26, 2010

All American Robot!


Isn't this just the cutest lil' patriotic robot ever?!?! I especially love the soda bottle cap eyes! This robot would be such a fun centerpiece at your 4th of July celebration. Wouldn't it look like a proud little American on Independence Day! I love Family Fun Magazine for a variety of reasons. This magazine always inspires me to get crafting with my daughter and as a family. Most of their crafts require items you already have lying around your home like the coffee cans and paper towel rolls on this patriotic robot. I know I said my favorite part was his cute little bottle cap eyes---but, now I am thinking it is the fact that he is full of sugary goodness on the inside! I am giving this crafty project a score of EASY PEEZY LEMON SQUEEZY!
For instructions and guide on how to make this Patriotic Robot for your 4th of July celebration, click here.

---Sealed with a Kiss, Kirsten
S.W.A.K.